Importing data from an Excel file
Introduction
“Welcome to Lesson 1 of Module 2, where we’ll cover how to import data from an Excel file into Power BI. Excel is one of the most widely used business applications globally and is often the first step in creating a report in Power BI. In this lesson, we’ll walk through the process step-by-step, ensuring you’re confident in importing and preparing Excel data for analysis.”
Key Points to Remember About Excel and Power BI
- Power BI supports Excel workbooks created in Excel 2007 and later.
- Your files must be saved in the
.xlsxor.xlsmformat and should not exceed 1 GB.- Ensure your data is in a table format with properly named columns for better compatibility with Power BI.
Steps to Import an Excel File
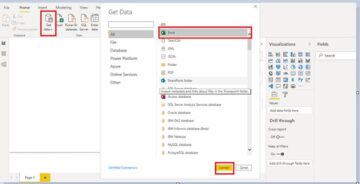
- Open Power BI Desktop.
- Click on the Home tab, and then select Get Data > Excel Workbook.
- Browse to the location of your file, select it, and click Open.
- Power BI will display the Navigator Pane, where you can view all the worksheets and tables in your Excel file.
- Select the data you want to load. You have two options:
- Load: Import the data directly as-is into Power BI.
- Transform Data: Open the Power Query Editor to clean and prepare the data before loading.
- Click Load or Transform Data to proceed.
Note: If your data isn’t already in a table format, you can convert it in Excel before importing. Highlight your data and press Ctrl + T to create a table.
Lesson Recap
“You’ve now learned how to import Excel data into Power BI. In the next lesson, we’ll explore Power Query, the tool that helps you clean and transform raw data into something more usable for analysis.”